Seed Stitch Scarf: An Easy One-Row Pattern That Lies Flat
A seed stitch scarf worked over 31 stitches, so every row is the same: k1, then p1, k1 to the end. Includes how to read your stitches, move the yarn and keep the tension even.
Tutorial at a glance
Materials
- Tapestry needle
- Scissors
- Tape measure
Seed stitch has one rule: knit the stitches that were purled on the row before, and purl the ones that were knit. Each knit ends up sitting on top of a purl, and the fabric fills with small raised bumps like scattered seeds. It lies flat, looks the same on both sides and has firm, tidy edges, which is everything a scarf needs. The pattern below uses an odd number of stitches so that every row is worked exactly the same way.
How seed stitch works
Seed stitch uses only the knit stitch (k) and the purl stitch (p), alternating one at a time across the row. That is the same sequence as 1×1 rib. The difference is in what happens on the next row. In rib you keep the columns going: a knit over a knit, a purl over a purl. In seed stitch you break the columns on every row by doing the opposite of what you see.
Learning to read the stitches (sts) on your left needle makes this easy:
- A stitch with a smooth V below it was knit as it faces you. Purl it.
- A stitch with a small horizontal bump at its base was purled as it faces you. Knit it.
Once you can see the bumps you no longer need to count “knit, purl, knit” in your head, and you can put the scarf down mid-row and pick it up again without losing your place.
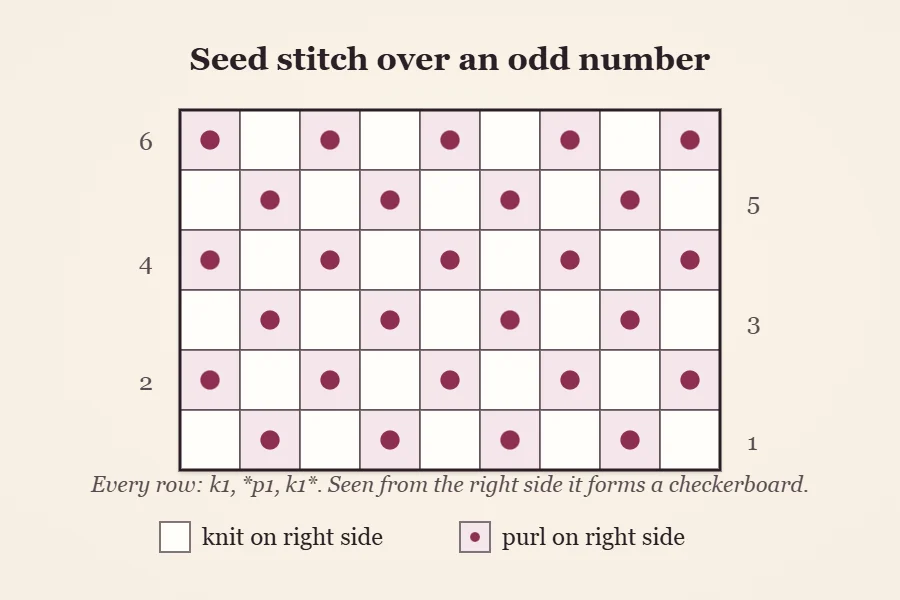
The odd-number trick
If you cast on (CO) an even number of stitches, seed stitch needs two different rows: one that begins with a knit and one that begins with a purl. With an odd number, a row that starts with k1 also ends with k1. When you turn the work, that last knit stitch faces you as a purl bump, so the new row starts with k1 again.
The whole pattern becomes a single line: k1, *p1, k1*; repeat from * to the end. Every row, both sides. There is no right side (RS) or wrong side (WS) to keep track of, and no row counter.
What you need
- Yarn: worsted weight (#4), about 330 yd (300 m), in a light or medium solid color. Seed stitch uses a little more yarn than garter, so treat this as an estimate and keep a spare ball if your yardage is close.
- Needles: US 8 (5 mm) straight needles.
- Notions: tapestry needle, scissors, tape measure.
Texture is the whole point of this stitch, so pick a smooth, plied yarn. Fuzzy, very dark or strongly variegated yarns hide the bumps. The guide to the best yarn for scarves explains which fibers show stitches clearly and feel soft against the neck.
Seed stitch scarf pattern
Finished size: about 7 in (18 cm) wide and 64 in (163 cm) long.
Gauge: about 18 stitches to 4 in (10 cm) in seed stitch, which is 4.5 stitches per inch. At that gauge 31 stitches measure 31 ÷ 4.5 = 6.9 in. Exact gauge is not critical for a scarf, but a quick gauge swatch tells you whether you will land near that width.
- CO 31 stitches. Keep the cast-on relaxed so the end of the scarf does not pull in.
- Every row: k1, *p1, k1*; repeat from * to the end.
- Repeat this row until the scarf measures 64 in (163 cm), or until it is about as long as the wearer is tall.
- Bind off (BO) in pattern: knit the knits and purl the purls as you bind off, so the last edge matches the texture. Leave about 28 in (71 cm) of yarn for the bind-off, which is four times the scarf width.
- Cut the yarn, leaving a tail of at least 6 in (15 cm), and pull it through the last stitch.
Changing the width
Any odd number works. At the same gauge:
| Cast on | Approximate width | Good for |
|---|---|---|
| 23 stitches | 5 in (13 cm) | A child’s scarf |
| 27 stitches | 6 in (15 cm) | A narrow adult scarf |
| 31 stitches | 7 in (18 cm) | The standard width used here |
| 35 stitches | 7.75 in (20 cm) | A wider, warmer scarf |
A wider scarf needs more yarn in the same proportion: 35 stitches use roughly 13 percent more than 31.
Moving the yarn front and back
The yarn has to be at the back of the work to knit and at the front to purl. In seed stitch that means moving it before every single stitch. Pass it between the two needle tips each time: forward after a knit, back after a purl.
Watch out
If the yarn travels over the top of the right needle instead of between the tips, it wraps the needle and creates an extra stitch with a hole under it. Count your stitches every few rows at first. If you have 32 instead of 31, look for the wrap in the row you just worked and undo back to it.
This constant movement makes seed stitch slower than garter. It becomes a small, rhythmic flick of the hand after a few inches.
Keeping the tension even
The strand that crosses from a knit to the following purl is slightly longer than the one going the other way, so purl stitches tend to come out looser. In seed stitch that shows as bumps of uneven size. Two habits help:
- After bringing the yarn forward, give it a gentle tug before wrapping the purl. Snug, not tight.
- Work the stitches near the needle tips rather than pushing them far down the shaft, where they stretch.
If the fabric feels stiff, your stitches are too tight for this stitch pattern. Going up one needle size gives a softer, drapier scarf, as described in the guide to needle size for scarves.
Spotting and fixing a mistake
The usual slip is to knit a knit and purl a purl for part of a row. You will see it a row or two later as a short patch of ribbing: two Vs stacked in a column where there should be a V and a bump. If it is on the row you are working, unknit stitch by stitch back to the error and rework it. If it is several rows down and only one or two stitches wide, many knitters leave it. In a textured fabric it is hard to find again once the scarf is finished.
If the whole scarf is turning into rib, check your stitch count. An even number with this one-row instruction produces 1×1 rib instead of seed stitch.
Finishing
The edges of seed stitch are firm and even on their own, so there is no need to slip the first stitch of the row. Thread each tail on the tapestry needle and run it through the purl bumps along a row for a couple of inches, then double back. Both faces of the scarf show, so take a moment to hide the tails properly using the methods in how to weave in ends.
Seed stitch needs little blocking. If the scarf is wool, a soak and a flat dry will even out the stitches. For acrylic, laying it flat and smoothing it by hand is enough.
The name causes some confusion: patterns written in the UK call this same fabric moss stitch. The difference is laid out in moss stitch vs seed stitch.
Frequently asked questions
Does seed stitch need an odd or even number of stitches?
It works on either, but an odd number is simpler because every row is the same: k1, then p1, k1 to the end. With an even number you alternate two rows, one starting with a knit and one starting with a purl.
Why does my seed stitch look like ribbing?
You are knitting the knits and purling the purls, which stacks them into columns. Seed stitch needs the opposite on every row. If you are following the one-row instruction, count your stitches, because an even number turns it into 1x1 rib.
Does a seed stitch scarf curl?
No. Knit and purl stitches are spread evenly over both faces, so the fabric is balanced and stays flat without a border.