Mistake Rib Scarf Pattern: A One-Row Repeat for Beginners
A mistake rib scarf on 35 stitches: one row, repeated on both sides, gives a thick, reversible fabric with deep ridges. Includes the stitch-count rule and quick checks for slips.
Tutorial at a glance
Materials
- Tapestry needle
- Scissors
- Tape measure
Mistake rib has one row to remember, and you work it on every row, both sides, from cast-on to bind-off. The name comes from how it is built: it is ordinary knit 2, purl 2 ribbing worked over a stitch count that is one stitch “wrong”, so the ribs never line up the way they would in a standard rib. The result is a thick, deeply grooved fabric that looks far more involved than it is.
What makes it different from regular rib
In standard 2×2 rib, every knit stitch sits on top of a knit stitch and every purl on top of a purl, which is why the instructions need two rows that mirror each other. In mistake rib, the stitch count is a multiple of 4 plus 3. That is one stitch short of a full repeat, so when you turn the work and start again with knit 2, purl 2, everything lands one stitch over from where it would in regular rib.
Seen from one side, the shift produces four kinds of column that repeat across the scarf:
- a column that is a knit stitch on every row and stands up as a sharp ridge
- a column that alternates knit and purl, row by row, with a pebbly texture
- a column that is a purl stitch on every row and sinks into a groove
- another alternating column
The ridges are narrower and the grooves deeper than in ordinary rib, and the pebbly columns between them give the fabric extra thickness.
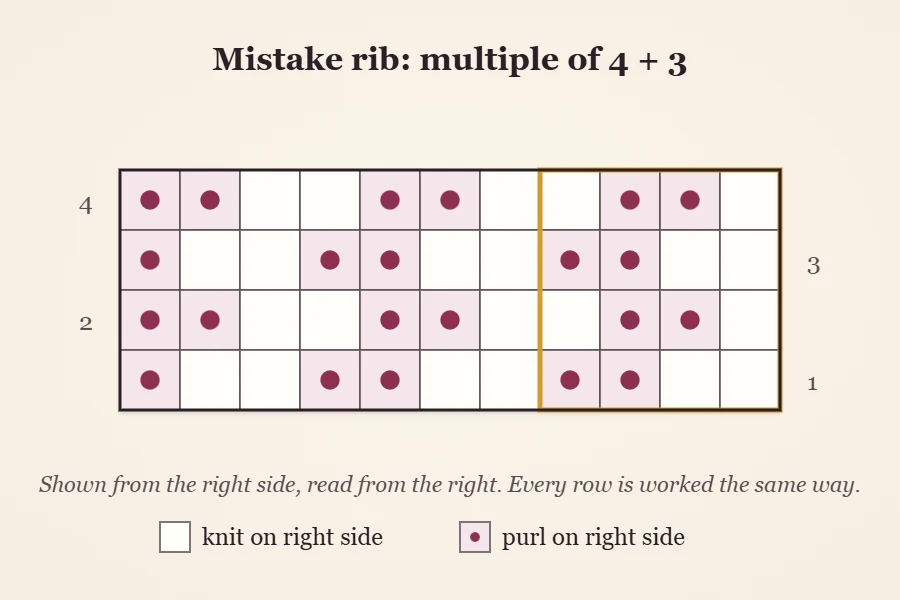
In the chart, an empty square is a knit stitch as seen from the right side and a dot is a purl. Follow any single column upward and you will see it is all empty squares, all dots, or the two alternating.
Materials and finished size
| Item | What you need |
|---|---|
| Yarn | Worsted weight (#4), roughly 350-450 yd (320-410 m) |
| Needles | US 8 (5 mm) straight needles |
| Notions | Tapestry needle, scissors, tape measure |
| Cast on | 35 stitches |
| Finished size | About 6.5 in (16.5 cm) wide relaxed and 65 in (165 cm) long |
Treat the yardage as an estimate and expect to be at the higher end: this is a dense fabric, and rib patterns use noticeably more yarn than garter. If you want a different size, the guide on how much yarn a scarf takes explains how to work out the amount from a swatch. A smooth, springy yarn such as wool or a wool blend gives the crispest ridges, but the stitch is forgiving and also works in soft acrylic.
The stitch count: a multiple of 4 plus 3
The count is what creates the pattern, so it has to be right. For this scarf, 4 x 8 = 32, plus 3 = 35 stitches. Other counts that fit:
- 27 stitches (4 x 6 + 3) for a narrow scarf, about 5 in (13 cm) relaxed
- 35 stitches (4 x 8 + 3) for the pattern as written
- 43 stitches (4 x 10 + 3) for a wide scarf, about 8 in (20 cm) relaxed
Like all ribs, this fabric pulls in, though a little less than standard 2×2 rib. The 35 stitches would measure nearly 8 in (20 cm) laid out flat at 4.5 stitches per inch, since 35 divided by 4.5 is 7.8, and they relax to about 6.5 in. If you are unsure which width suits you, the scarf width and length guide has typical dimensions.
Watch out
Count the cast-on twice. With 34 or 36 stitches the same row instruction no longer fits the count, and a multiple of 4 simply produces ordinary 2×2 rib. The count must be a multiple of 4 plus 3.
The pattern
Abbreviations: CO (cast on), BO (bind off), k (knit), p (purl), st(s) (stitch or stitches). Instructions between asterisks are repeated.
- CO 35 sts loosely.
- Every row: *k2, p2*; repeat from * to the last 3 sts, k2, p1.
- Repeat this row until the scarf measures 65 in (165 cm) or the length you want.
- BO in pattern: work the row as usual, k2, p2 and so on, lifting each st over the next as you go. Keep it loose.
- Cut the yarn, leaving a tail of at least 6 in (15 cm), and pull it through the last st.
On 35 stitches, the row is 8 repeats of k2, p2, which uses 32 stitches, followed by k2, p1 on the last 3. Move the yarn between the needle tips each time you change from knit to purl or back: to the front before a purl, to the back before a knit.
Why a one-row repeat suits beginners
- Nothing to track. There is no row 1 and row 2, and no right side to mark. Whenever you pick the scarf up, the next row is the same as the last.
- Every row starts and ends the same way. You always begin with k2 and always finish with p1. If the row ends any other way, you know immediately that something went wrong in that row, not ten rows later.
- It builds the key rib skill. Moving the yarn front and back between knits and purls becomes automatic after a few inches.
- It is fully reversible. Both faces show the same ridges and grooves, and the fabric does not curl, so it needs no border.
For a comparison with other flat, reversible options, see the overview of the best stitches for scarves.
Reading the fabric and fixing slips
Mistake rib is harder to read than ordinary rib, because you cannot simply knit the knits and purl the purls. Rely on the count instead. The most useful check is the end of the row: after the last full k2, p2 there should be exactly 3 stitches left.
| What you see | Likely cause | Fix |
|---|---|---|
| 4 stitches left at the end of a row | The yarn went over the needle and made an extra stitch | Undo the row stitch by stitch until you find the stray loop and drop it |
| 2 stitches left at the end of a row | Two stitches were worked together, or one was dropped | Count the stitches; undo the row to the mistake |
| A ridge that stops and turns pebbly | A group of 2 was worked as 1 or 3 somewhere in that row | Undo back to that row, or leave it if it is small |
Tip
Say the row quietly as you work it for the first few inches: “knit, knit, purl, purl”. When the rhythm settles in, your hands will carry it and you will only need to look up for the last three stitches.
Finishing
Weave each tail down one of the solid knit ridges, then back in the opposite direction for about an inch; the depth of the fabric hides it well. The steps are in how to weave in ends.
Block gently, if at all. Soaking a wool scarf, pressing the water out in a towel and laying it flat to dry evens out the stitches. Do not stretch it wide or pin it out, which flattens the ridges. Acrylic does not hold a wet block and must never be pressed with an iron.
Variations
- Bulky yarn: in bulky (#5) yarn on US 10 (6 mm) needles, CO 19 sts (4 x 4 + 3) for a thick, quick scarf.
- Softer drape: use US 9 (5.5 mm) needles with the worsted yarn. The ridges stay visible but the fabric loosens.
Frequently asked questions
Why is it called mistake rib?
It is knit 2, purl 2 ribbing worked over a stitch count that is one short of a full repeat, so the ribs land one stitch off on every row. The offset looks like an error in ordinary rib but creates the pattern.
How many stitches do I cast on for mistake rib?
Any multiple of 4 plus 3. This scarf uses 35 stitches in worsted-weight yarn; 27 or 43 also work for narrower or wider versions.
Is mistake rib the same on both sides?
Yes. Both faces show the same ridges and grooves, and the fabric lies flat, which makes it well suited to scarves.