How to Block a Knitted Scarf: Wet, Steam and Spray Methods
Blocking straightens the edges and evens out the stitches of a finished scarf. The right method depends on the fiber: wet blocking for wool, light hovering steam at most for acrylic.
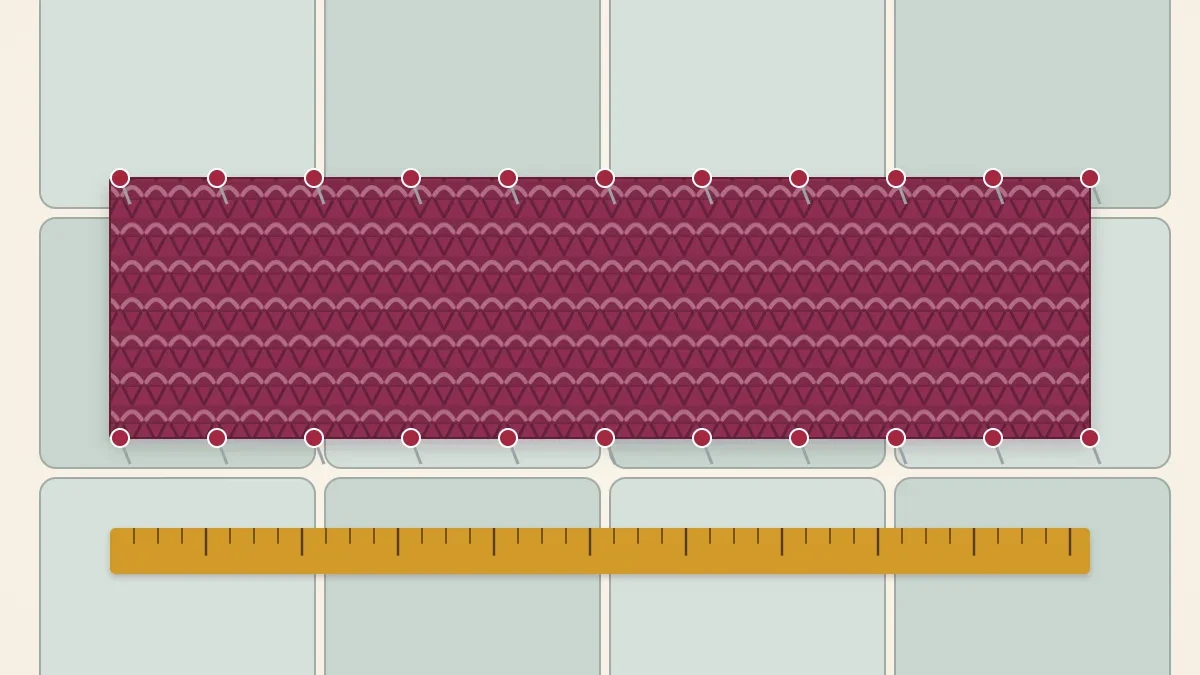
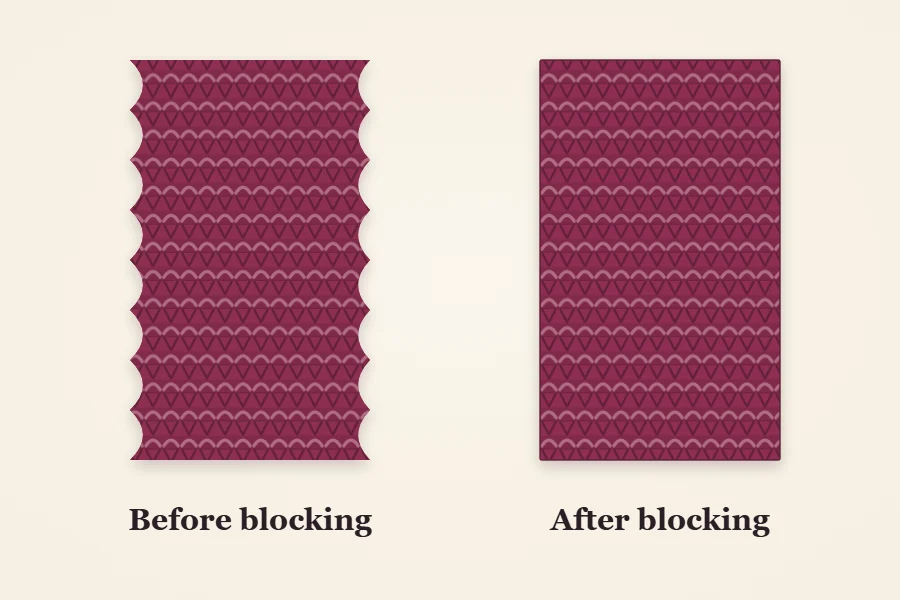
Blocking is nothing more than getting a finished scarf damp, arranging it to the shape and size you want, and leaving it alone until it is dry. Moisture relaxes the fibers, the stitches settle against each other, and the fabric keeps the shape it dried in. On a scarf that mostly means straighter side edges, more even stitches and a softer drape. How well it works depends almost entirely on what the yarn is made of, so the fiber decides the method.
What blocking can and cannot fix
Blocking is a finishing step, not a repair. It improves fabric that is basically sound and does very little for a structural problem.
Blocking can:
- even out slightly irregular stitches and rows of mixed tension;
- straighten side edges that wander a little;
- square up the cast-on and bind-off ends;
- relax a stiff fabric so it drapes better;
- add a modest amount of width or length, usually no more than an inch or so in width on a wool scarf.
Blocking cannot:
- remove extra stitches, so a scarf that grew wider row by row stays wider;
- close a dropped stitch or a hole;
- permanently flatten plain stockinette, which rolls again as soon as it is worn (the reasons are in why knitted scarves curl);
- turn a 50 in (127 cm) scarf into a 65 in (165 cm) one without leaving the fabric thin and strained.
Check the fiber before you choose a method
Read the yarn label for fiber content and care symbols. If the label is gone, treat the yarn as the most delicate thing it might be. The fibers are compared in more detail in the guide to the best yarn for scarves; for blocking, this is what matters.
| Fiber | Best method | What to expect |
|---|---|---|
| Wool, alpaca and other animal fibers | Wet blocking | Responds very well and holds the blocked shape until the next wash |
| Superwash wool | Wet blocking, handled gently | Tends to grow when wet; pat it back to size instead of stretching it |
| Cotton and linen | Wet or spray blocking | Relaxes and softens, but has no spring, so do not stretch it |
| Acrylic and other synthetics | Light hovering steam, or simply wash and lay flat | Does not hold a wet block; heat changes it permanently |
| Blends | Follow the most delicate fiber | A wool-rich blend blocks better than an acrylic-rich one |
What you need
- A clean sink or basin and cool to lukewarm water
- Two large towels
- A flat surface you can pin into: foam blocking mats, or a spare bed or carpet covered with a towel
- Rust-proof pins (T-pins are easiest to handle)
- A tape measure
- Optional: a no-rinse wool wash, and blocking wires for long straight edges
Wet blocking, step by step
Weave in the yarn tails first but leave them untrimmed. The full method is in how to weave in ends.
- Fill the basin with cool to lukewarm water and add wool wash if you are using it.
- Press the scarf under the surface and let it soak for 15 to 20 minutes so the water reaches the core of the yarn. Do not rub or swish it; agitation is what felts wool.
- Lift the scarf out in a supported bundle. A wet scarf is heavy, and letting it hang from one end stretches it.
- Squeeze gently. Never wring or twist.
- Lay the scarf on a towel, roll the towel up and press on the roll to take out more water. The scarf should feel damp, not dripping.
- Spread it on the mats and pat it into a rectangle with your hands.
- Measure the width in several places along the length and adjust until it matches everywhere.
- Pin the edges, then leave the scarf until it is completely dry. Depending on the yarn thickness and the room, that can take a day or more.
Steam blocking and spray blocking
Spray blocking is the gentlest option. Pin the dry scarf to shape, mist it with clean water from a spray bottle until the surface is evenly damp, and let it dry. It suits cotton, linen, delicate blends and any scarf that only needs its edges tidied.
Steam blocking uses a steam iron or garment steamer held an inch or two (3 to 5 cm) above the pinned scarf. Let the steam sink in, move along, and leave the fabric to cool and dry before unpinning. The iron never touches the knitting and never presses down.
Watch out
Never press acrylic with an iron. Direct heat melts the fibers flat, and even heavy steam can leave the fabric limp and shiny for good. That change cannot be undone. Hover, keep the steam light, and test on a swatch or on the last few inches of the scarf first.
Pinning straight edges
A scarf is too long for most blocking surfaces, so work in sections or fold the mats into a long run on the floor. Pin the four corners first, then the midpoint of each long side, then keep halving the gaps until there is a pin every 2 to 3 in (5 to 8 cm). Pins that are too far apart pull the edge into scallops.
Use the tape measure as you go: if the scarf should be 7 in (18 cm) wide, check that it is 7 in at every pin. The grid lines printed on many foam mats make this faster. Blocking wires threaded through the edge stitches give the straightest line with the fewest pins. If the edges are uneven enough that pinning feels like a fight, the cause is in the knitting, and the habits in how to get neat scarf edges will help more on the next scarf than blocking will on this one.
Tip
No room to lay the whole scarf flat? Block one half, let it dry, then block the other, overlapping the middle by a few inches so the two halves end up the same width.
Rib and garter need a lighter hand
Ribbing is meant to pull in. If you stretch a ribbed scarf sideways and pin it open, the columns flatten and much of the elastic, squishy quality is gone until the next wash, and with some yarns for longer. For a scarf like the 2×2 ribbed scarf, lay it down relaxed, straighten the edges with your hands, and pin only the ends if they need squaring.
Garter stitch is thick and springy, and it tends to grow in length once wet. Support the scarf when you lift it, and push the ridges gently together on the mat rather than pulling them apart. Do not press on garter or any textured stitch; flattened ridges do not come back with pinning.
After the scarf is dry
Take out the pins only when the fabric is dry all the way through, including the thicker edges. Trim the woven-in tails close to the surface now that the stitches have settled. A wool scarf keeps its blocked shape through wearing and loses it in the wash, so lay it flat to the same measurements each time you wash it. That takes a few minutes and does not need pins unless the edges have wandered again.
Frequently asked questions
Do I have to block a scarf?
No. A garter or ribbed scarf is wearable straight off the needles. Blocking is worth doing when the edges wander, the stitches look uneven or the fabric feels stiff, and it makes the most difference on wool.
Can I block an acrylic scarf?
Acrylic does not hold a wet block, so soaking and pinning changes very little. You can relax it with light steam held an inch or two above the fabric, but never press it with an iron, because heat flattens the fibers permanently.
How long does a blocked scarf take to dry?
It depends on the yarn thickness, the fiber and the room, but allow at least a day and sometimes longer for bulky wool. Leave the pins in until the scarf is dry all the way through.